Extra information
System documentation: https://developers.lightspeedhq.com/retail/introduction/introduction/Connector package documentation
Table of Contents
- 1. Setting up the Lightspeed HTTP Client
- 1.1 Interactive Authentication
- 1.2 Bearer Token Authentication
- 2. Subscribing to entities from Lightspeed
- 2.1 Steps
- 2.2 General concept
- 3. Publishing entities to Lightspeed
- 3.1 Steps
- 3.2 General concept
1. Setting up the Lightspeed HTTP Client
1.1 Interactive Authentication- In the Alumio Dashboard, go to Clients -> HTTP Clients. Create a new HTTP Client and select Lightspeed Retail Client as the prototype of the HTTP Client.
- Fill in the Base URL, App Token, and Staff Token according to your Lightspeed Retail account, you can enable logging with the following options: Long, Full, Simple, and Custom.
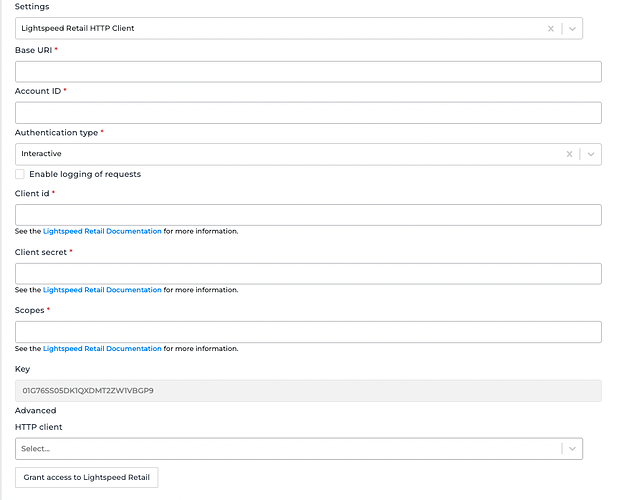
- After all fields are filled, the last step of the Interactive Authentication type is “Grant Access to Lightspeed”. It will redirect you to the Lightspeed page and authorize the application by signing in using your credentials.
-
Save the HTTP Client.
Notes:
- Client ID and Client secret are provided by Lightspeed Retail, you can register your account and get them here: https://cloud.lightspeedapp.com/oauth/register.php
- Token URL: https://cloud.lightspeedapp.com/oauth/access_token.php
- Authorize URL: https://cloud.lightspeedapp.com/oauth/authorize.php
- Scopes: employee: all
- We can also select another method of authentication using Bearer Token.
- Fill in the Base URL, App Token, and Staff Token according to your Lightspeed Retail account, you can also enable logging with the following options: Long, Full, Simple and Custom.
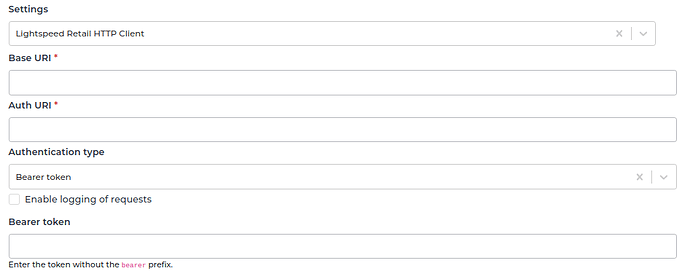
- Save the HTTP Client. Note: Please ignore the “Grant Access to Lightspeed” button for this authentication.
2. Subscribing to Entities from Lightspeed
2.1 Steps- Go to Connections -> Incoming, create a new incoming configuration, and select the LightSpeed Retail Subscriber as the subscriber.
- Select the entity you want to subscribe to from LightSpeed Retail.
- Add any request parameters needed to subscribe to the entity. Please refer to an example in the General Concept section.
- You can optionally add a transformer to manipulate the request parameters into something of your choice.
- Select the Lightspeed Retail HTTP Client to use.
- You can also optionally enable pagination to allow the fetching of paginated entities. In the case of LightSpeed Retail, you should use the “Increase query parameter” as the pagination type (only available for some entities).
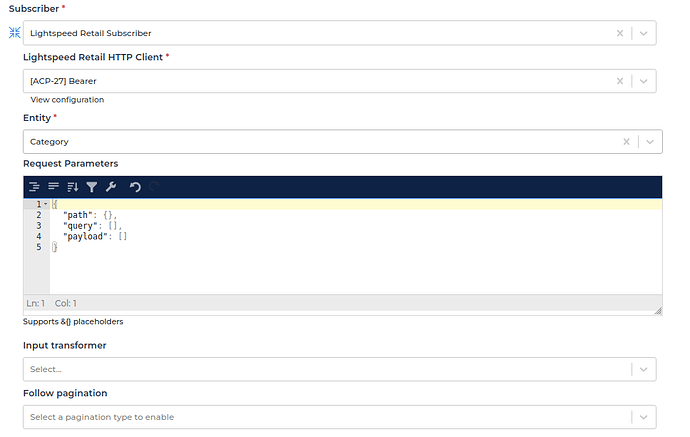


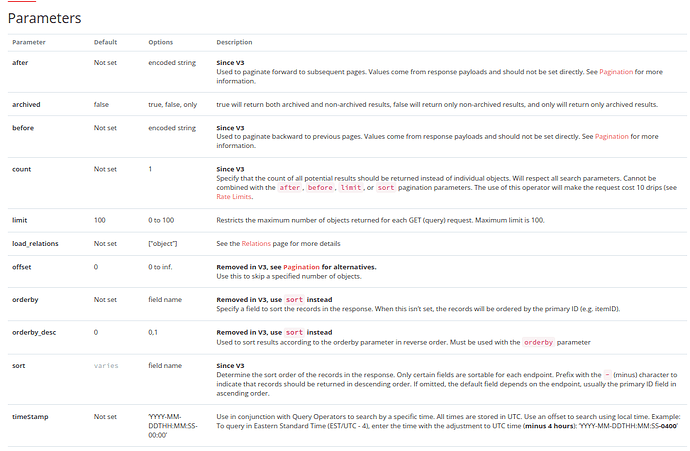
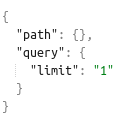
- “Path” is the path parameter of the URL. For example the {id}.
- “Query” is a defined set of parameters attached to the end of a URL.
Example: www.url.com?type=true&start=0
3. Publishing Entities to Lightspeed
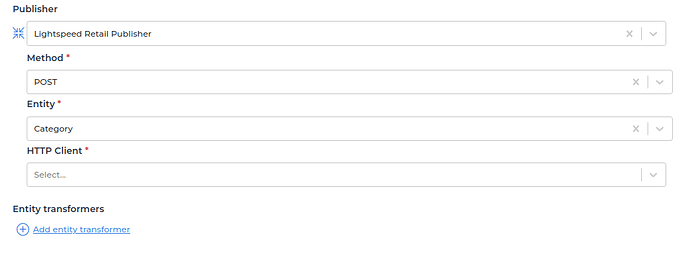
3.1 Steps- Go to Connections -> Outgoing, create a new outgoing configuration and select Lightspeed Retail Publisher as the publisher.
- Select the method that you want the publisher to use with the data.
- Select the Lightspeed Retail endpoint where you want the data to be published.
- Select the HTTP Client to use.

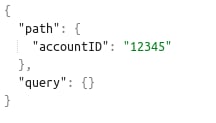
- “Path” is the path parameter of the URL. For example the {id}.
- “Query” is a defined set of parameters attached to the end of a URL.
Example: www.url.com?type=true&start=0 - “Payload” is the data contained within a request.