> ## Documentation Index
> Fetch the complete documentation index at: https://docs.alumio.com/llms.txt
> Use this file to discover all available pages before exploring further.
# Installation
To begin using the integration, you need to install the required template in Alumio.
**Step 1: Download the Integration Template.**
Download the latest version of the integration template by clicking on the file below: [https://library.alumio.com/](https://library.alumio.com/)
**Step 2: Import the Template into Alumio.**
1. Log in to your Alumio Dashboard.
2. Navigate to System → Import / Export.
3. Upload the downloaded template. You’ll see a list of the configurations ready to import. Select All and click the “Import configuration” button. Verify that all Incoming, Routes, Outgoing, Transformers, and Schedulers are correctly imported.
## **Credentials Setup**
Before running the integration, you must configure credentials for Akeneo and Spryker in Alumio.
**Step 1: Retrieve API Credentials from Akeneo.**
* Log in to Akeneo as an admin user.
* Navigate to **Connect → Connection-settings.**
* Create a new connection (if necessary) and retrieve the following:
1. Client ID.
2. Secret Key.
3. Username.
4. Password.
 **Step 2: Retrieve API Credentials from Spryker.**
For Spryker, you’ll only need to use your username and password.
* Username.
* Password.
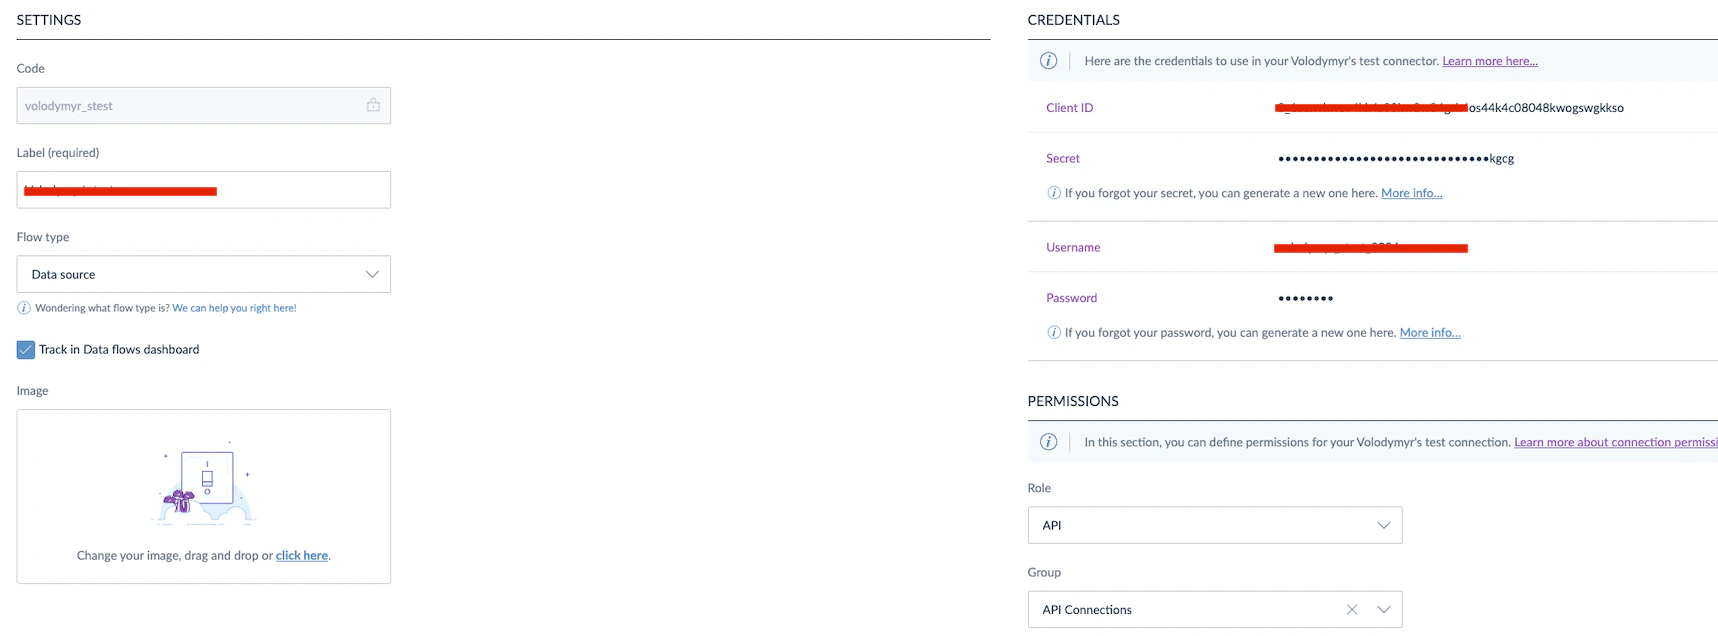
**Step 3: Configure Credentials in Alumio.**
* In Alumio, go to **System → Environment variables.**
* Fill in all credentials based on what you get from Akeneo and Spryker.
* Click Save & Apply.
## **Customization**
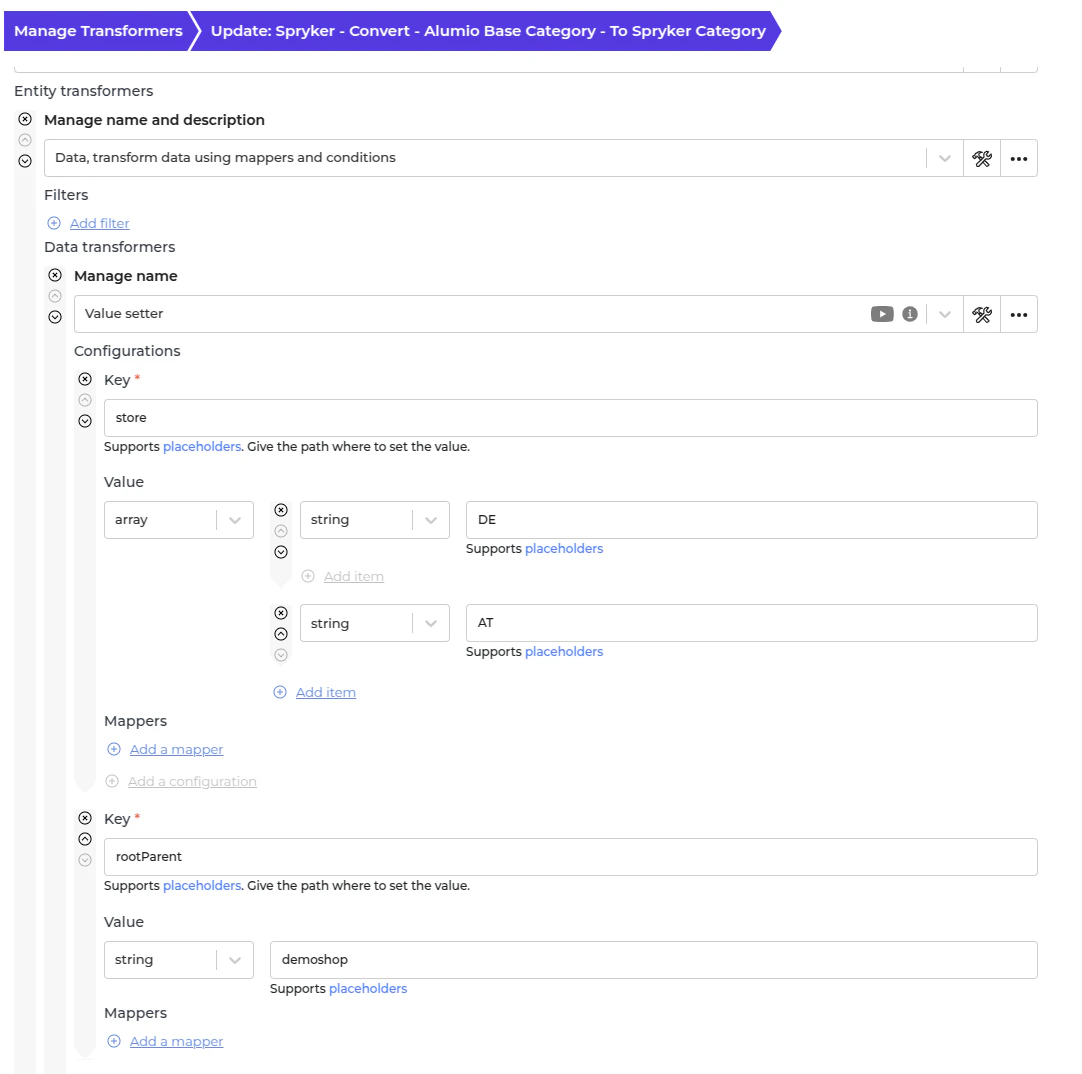
**Customizing Categories Synchronization from Akeneo to Spryker - Set store**
* Navigate to **"Transformer → Spryker - Convert - Alumio Base Category - To Spryker Category"**.
* Find the first value setter and change the array as needed.
* Save the transformer.
**Step 2: Retrieve API Credentials from Spryker.**
For Spryker, you’ll only need to use your username and password.
* Username.
* Password.
**Step 3: Configure Credentials in Alumio.**
* In Alumio, go to **System → Environment variables.**
* Fill in all credentials based on what you get from Akeneo and Spryker.
* Click Save & Apply.
## **Customization**
**Customizing Categories Synchronization from Akeneo to Spryker - Set store**
* Navigate to **"Transformer → Spryker - Convert - Alumio Base Category - To Spryker Category"**.
* Find the first value setter and change the array as needed.
* Save the transformer.
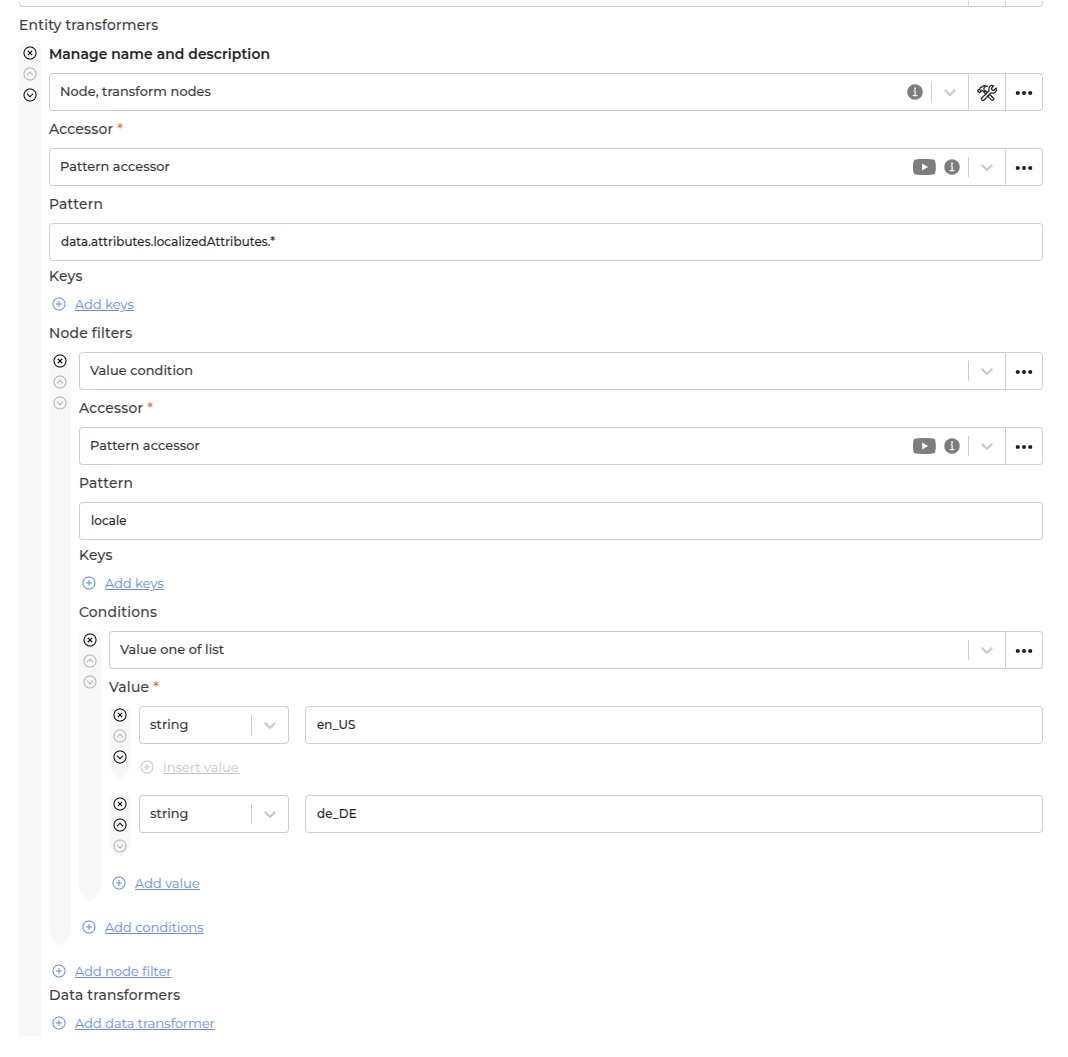
 **Customizing Categories Synchronization from Akeneo to Spryker - Set locale**
* Navigate to **"Transformer → Spryker - Filter Category - Filter localized attributes by locale"**.
* Add or remove a locale in the first Node filter.
* Save the transformer.
**Customizing Categories Synchronization from Akeneo to Spryker - Set locale**
* Navigate to **"Transformer → Spryker - Filter Category - Filter localized attributes by locale"**.
* Add or remove a locale in the first Node filter.
* Save the transformer.
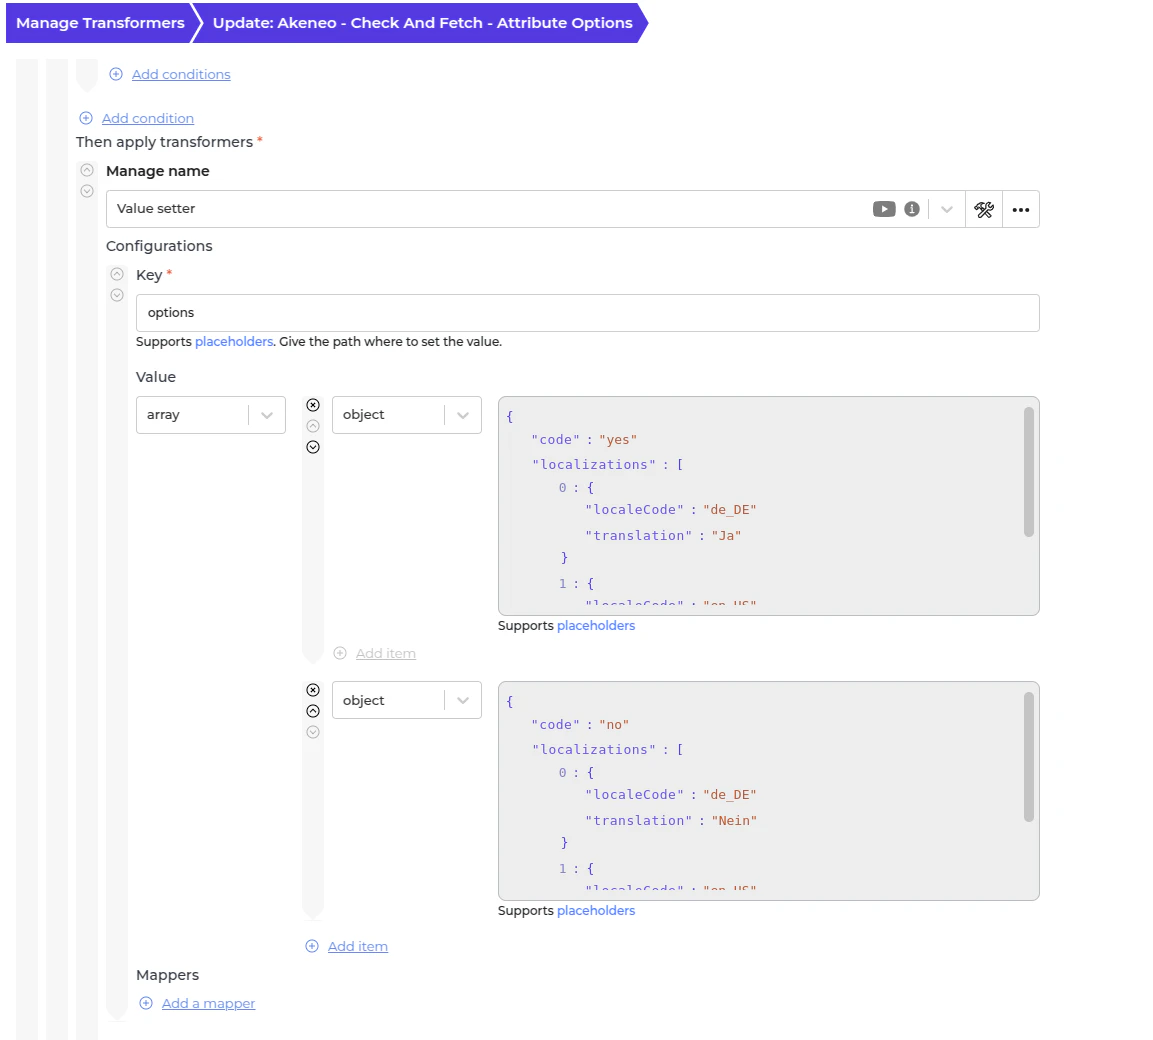
 **Customizing Attributes Synchronization from Akeneo to Spryker - Set boolean attribute**
* Navigate to **"Transformer → Akeneo - Check and fetch - Attribute options"**.
* Find the first value setter and change the object's boolean value according to your needs.
* Save the transformer.
**Customizing Attributes Synchronization from Akeneo to Spryker - Set boolean attribute**
* Navigate to **"Transformer → Akeneo - Check and fetch - Attribute options"**.
* Find the first value setter and change the object's boolean value according to your needs.
* Save the transformer.
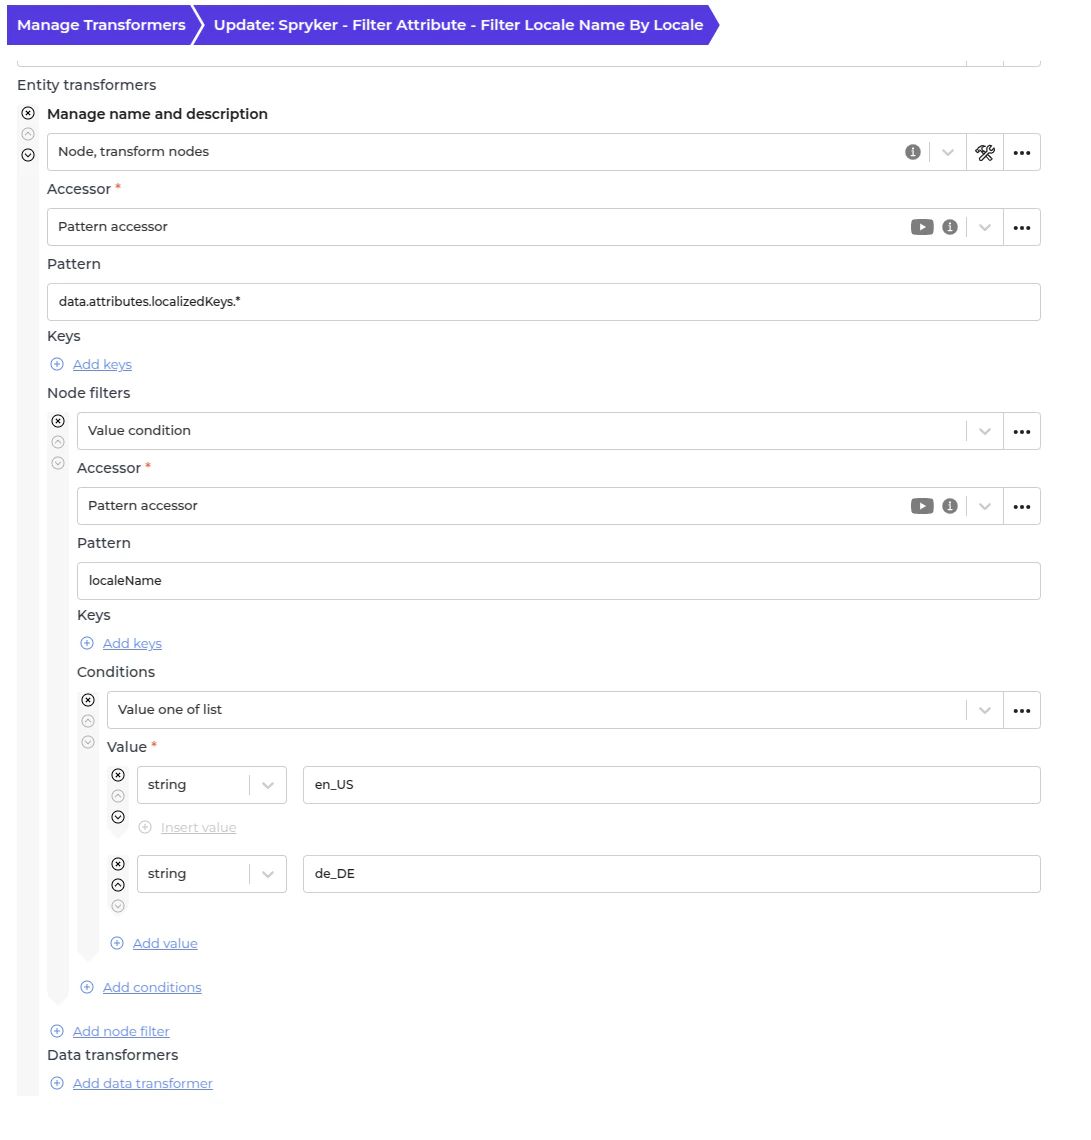
 **Customizing Attributes Synchronization from Akeneo to Spryker - Set locale**
* Navigate to **"Transformer → Spryker - Filter Attribute - Filter locale name by locale"**.
* Please add or remove a locale in the first Node filter.
* Save the transformer.
**Customizing Attributes Synchronization from Akeneo to Spryker - Set locale**
* Navigate to **"Transformer → Spryker - Filter Attribute - Filter locale name by locale"**.
* Please add or remove a locale in the first Node filter.
* Save the transformer.
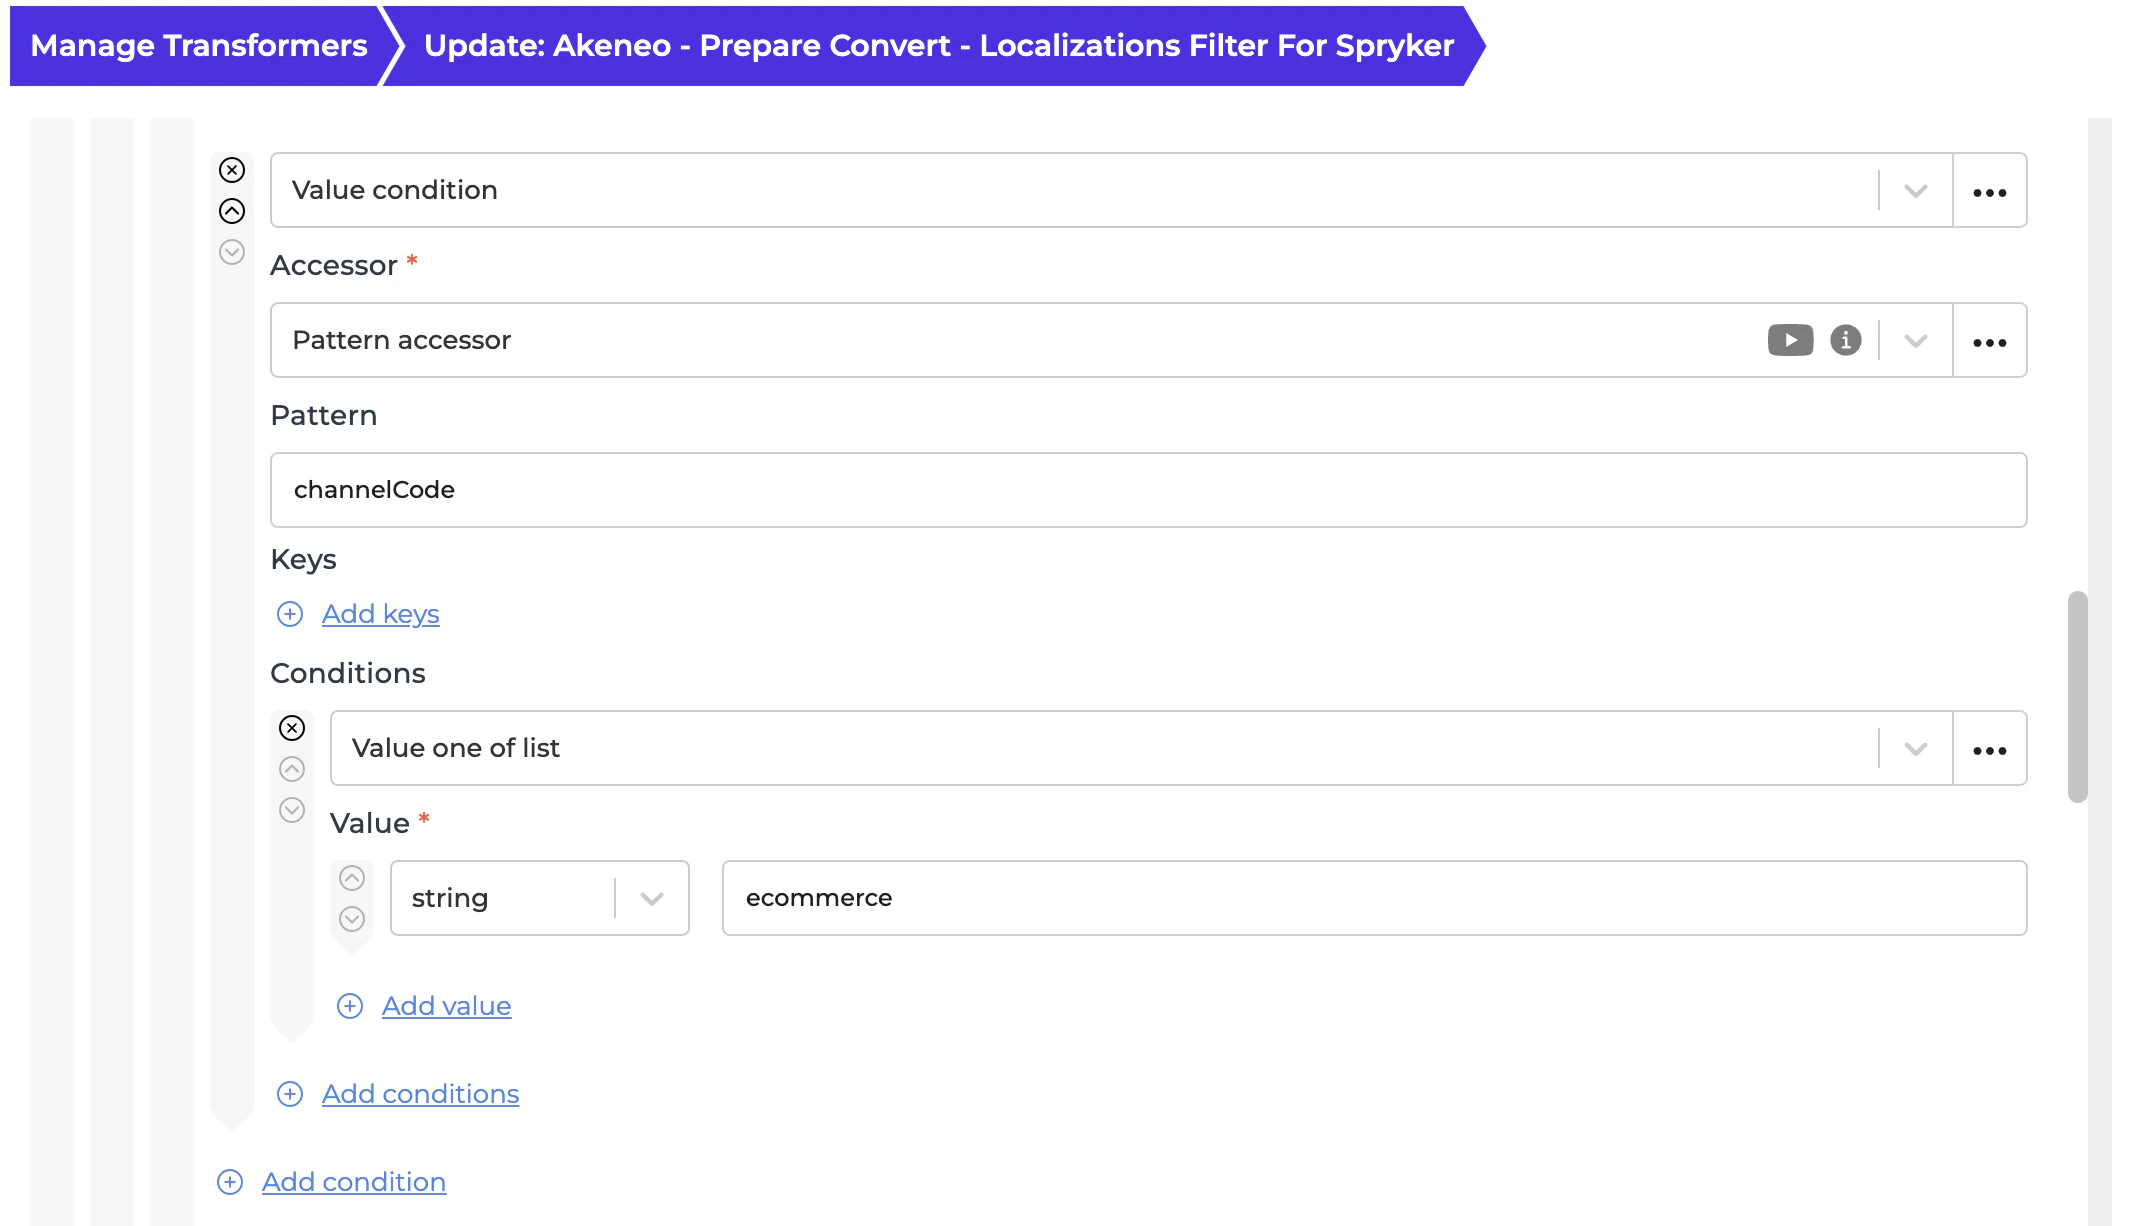
 **Customizing Akeneo Synchronize Products to Spryker - Set channel code**
* Navigate to **"Transformer → Akeneo - Prepare Convert - Localizations filter for Spryker"**.
* Please add or remove the channel code in the first Node filter.
* Save the transformer.
**Customizing Akeneo Synchronize Products to Spryker - Set channel code**
* Navigate to **"Transformer → Akeneo - Prepare Convert - Localizations filter for Spryker"**.
* Please add or remove the channel code in the first Node filter.
* Save the transformer.
 **Customizing Akeneo Synchronize Products to Spryker - Set Base Information**
* Navigate to **Transformer → Spryker - Set - Base Information.**
* Go to the “Overview” tab to see what kind of information you can set.
**Customizing Akeneo Synchronize Products to Spryker - Set Base Information**
* Navigate to **Transformer → Spryker - Set - Base Information.**
* Go to the “Overview” tab to see what kind of information you can set.
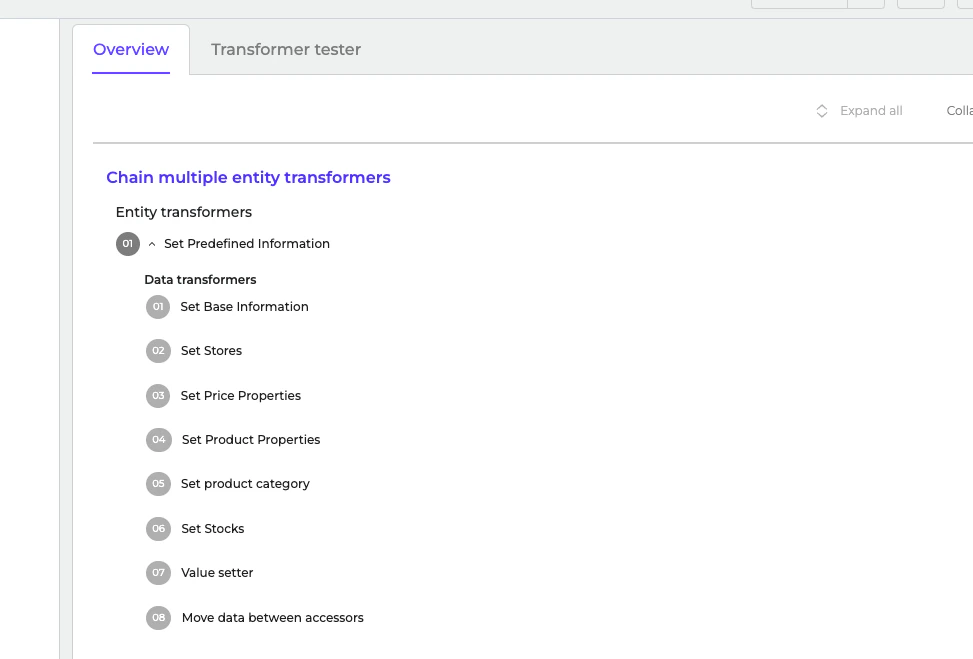 * Go to each data transformer and make necessary adjustments.
* Save the transformer.
**Customizing Akeneo Synchronize Products to Spryker - Set How many Products per task**
* Navigate to **Incoming → Akeneo - Fetch Storage - Product Model Alumio Base.**
* Go to the subscriber section.
* Go to each data transformer and make necessary adjustments.
* Save the transformer.
**Customizing Akeneo Synchronize Products to Spryker - Set How many Products per task**
* Navigate to **Incoming → Akeneo - Fetch Storage - Product Model Alumio Base.**
* Go to the subscriber section.
 * Adjust the value for the “Item in group” field. For example, if you set 15, then it’ll be 15 products per task.
* Save the incoming configuration.
## **How to Run the Template**
To ensure proper data synchronization, follow this guide:
**Step 1: Synchronize the Categories.**
This ensures all categories exist in Spryker before importing products.
* Go to **Incoming → Akeneo - Fetch - Categories.**
* Run it and wait until the incoming is finished.
* Verify whether the tasks are being created and executed in the Alumio dashboard.
* Make sure all the tasks are finished and verify the result in Spryker.
**Step 2: Synchronize the Attributes.**
Product attributes (e.g., colour, size) need to be imported before products.
* Go to **Incoming → Akeneo Synchronize Attributes to Spryker.**
* Run it and wait until the incoming is finished.
* Verify the tasks are being created and executed in the Alumio dashboard.
* Make sure all the tasks are finished and verify the result in Spryker.
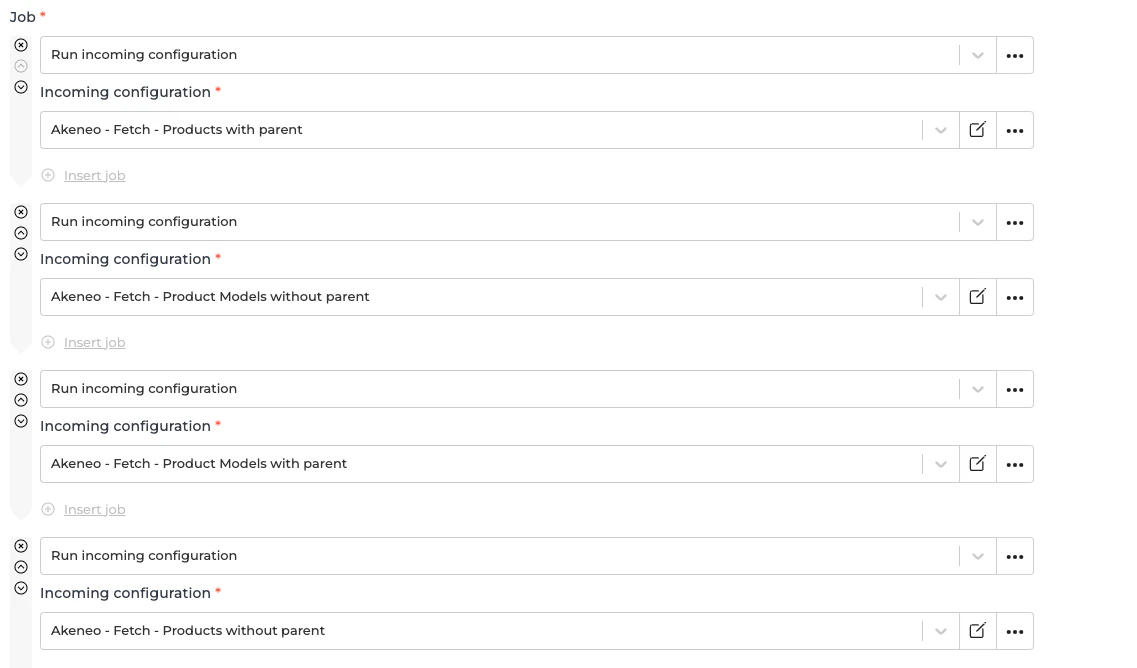
**Step 3: Synchronize the Product from Akeneo to Alumio**.
Run the following Incomings in the following order:
**1. Akeneo - Fetch - Products with parent.**
**2. Akeneo - Fetch - Product Models without parent.**
**3. Akeneo - Fetch - Product Models with parent.**
**4. Akeneo - Fetch - Products without parent.**
* Adjust the value for the “Item in group” field. For example, if you set 15, then it’ll be 15 products per task.
* Save the incoming configuration.
## **How to Run the Template**
To ensure proper data synchronization, follow this guide:
**Step 1: Synchronize the Categories.**
This ensures all categories exist in Spryker before importing products.
* Go to **Incoming → Akeneo - Fetch - Categories.**
* Run it and wait until the incoming is finished.
* Verify whether the tasks are being created and executed in the Alumio dashboard.
* Make sure all the tasks are finished and verify the result in Spryker.
**Step 2: Synchronize the Attributes.**
Product attributes (e.g., colour, size) need to be imported before products.
* Go to **Incoming → Akeneo Synchronize Attributes to Spryker.**
* Run it and wait until the incoming is finished.
* Verify the tasks are being created and executed in the Alumio dashboard.
* Make sure all the tasks are finished and verify the result in Spryker.
**Step 3: Synchronize the Product from Akeneo to Alumio**.
Run the following Incomings in the following order:
**1. Akeneo - Fetch - Products with parent.**
**2. Akeneo - Fetch - Product Models without parent.**
**3. Akeneo - Fetch - Product Models with parent.**
**4. Akeneo - Fetch - Products without parent.**
 These steps manage a structure based on the Akeneo structure and store the product in **Alumio storage** for further processing.
**Step 4: Synchronize the existing ID’s & Code’s from Spryker.**
Before running the product synchronization to Spryker, it is required to fetch all existing IDs/Codes for Abstract/Concrete products, categories, attributes, etc., from Spryker into Alumio storage. This will help Alumio check and fetch IDs from Spryker more quickly during the product synchronization process.
* Run **Incoming → Spryker - Update storages.**
* Wait until the incoming is finished.
**Step 5: Synchronize the Products to Spryker.**
After setting up categories and attributes and structuring the products in Alumio storage, we can then start sending them to Spryker.
* Run **Incoming → Akeneo - Fetch Storage - Product Model Alumio Base.**
* Wait until the incoming is finished.
* Verify whether the tasks are being created and executed in the Alumio dashboard.
* Make sure all the tasks are finished and verify the result in Spryker.
## **Setting Up the Schedulers and Parallel Processing**
**Step 1: Enable Parallel Processing.**
* Go to **Routes → Akeneo - Fetch Storage - Product Model Alumio Base.**
* Enable the “Enable Parallel Execution” checkbox.
* Adjust “Maximum Parallel Executions” to a value that does not exceed your available Data Engines.
**Step 2: Configure the Schedulers in Alumio.**
To automate synchronization, you can set up scheduled jobs. Our template also includes a set of preconfigured job schedulers that are ready for you to enable. You can also modify them as needed to suit your project requirements.
These steps manage a structure based on the Akeneo structure and store the product in **Alumio storage** for further processing.
**Step 4: Synchronize the existing ID’s & Code’s from Spryker.**
Before running the product synchronization to Spryker, it is required to fetch all existing IDs/Codes for Abstract/Concrete products, categories, attributes, etc., from Spryker into Alumio storage. This will help Alumio check and fetch IDs from Spryker more quickly during the product synchronization process.
* Run **Incoming → Spryker - Update storages.**
* Wait until the incoming is finished.
**Step 5: Synchronize the Products to Spryker.**
After setting up categories and attributes and structuring the products in Alumio storage, we can then start sending them to Spryker.
* Run **Incoming → Akeneo - Fetch Storage - Product Model Alumio Base.**
* Wait until the incoming is finished.
* Verify whether the tasks are being created and executed in the Alumio dashboard.
* Make sure all the tasks are finished and verify the result in Spryker.
## **Setting Up the Schedulers and Parallel Processing**
**Step 1: Enable Parallel Processing.**
* Go to **Routes → Akeneo - Fetch Storage - Product Model Alumio Base.**
* Enable the “Enable Parallel Execution” checkbox.
* Adjust “Maximum Parallel Executions” to a value that does not exceed your available Data Engines.
**Step 2: Configure the Schedulers in Alumio.**
To automate synchronization, you can set up scheduled jobs. Our template also includes a set of preconfigured job schedulers that are ready for you to enable. You can also modify them as needed to suit your project requirements.
 To go to your scheduler's page, follow these steps:
* Navigate to **Integration → Schedulers.**
* Create and modify schedulers for:
**1. Category Sync - Spryker - Send Categories.**
**2. Attribute Sync - Akeneo - Fetch and check Attributes.**
**3. Product Sync - Akeneo - Fetch complete products.**
**4. Product Send to Spryker - Spryker - Send complete products.**
**Set appropriate execution intervals (e.g., hourly, daily)**
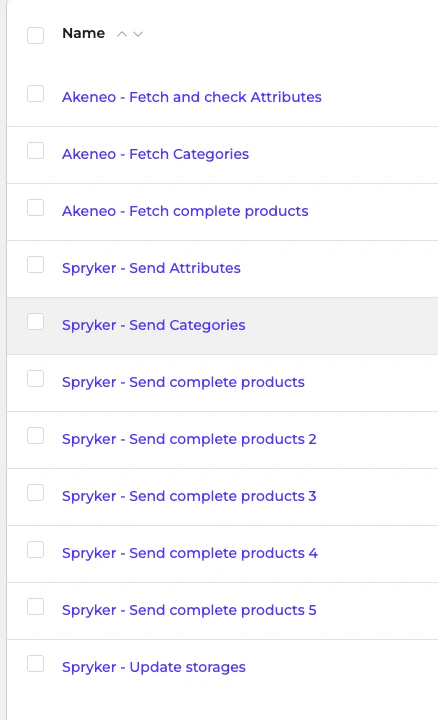
To enable parallel processing in a configuration, you need to create multiple schedulers for it. For example, you will see at least five schedulers set up for **“Spryker - Send Complete Products.”** This means the configuration within that scheduler will run with five parallel processes. Enable the schedulers.
## **Monitoring & Troubleshooting**
**Checking Logs**
* Navigate to **Incoming, Route or Task page → Logs** in Alumio.
* Review task execution details and error messages.
* Debug issues by checking logs for **failed transformations or API responses.**
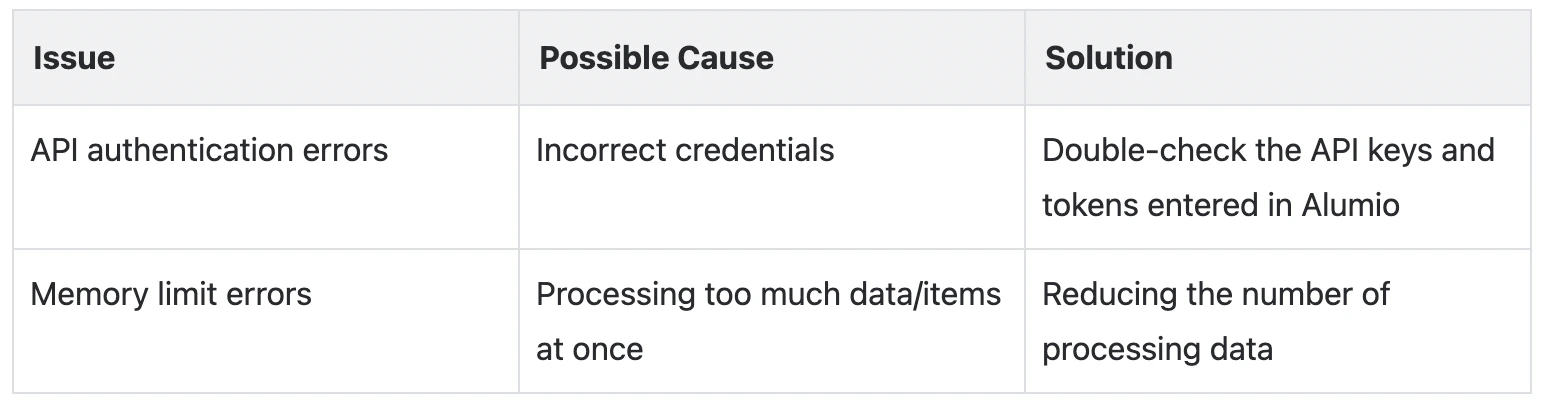
**Common Issues & Fixes**
To go to your scheduler's page, follow these steps:
* Navigate to **Integration → Schedulers.**
* Create and modify schedulers for:
**1. Category Sync - Spryker - Send Categories.**
**2. Attribute Sync - Akeneo - Fetch and check Attributes.**
**3. Product Sync - Akeneo - Fetch complete products.**
**4. Product Send to Spryker - Spryker - Send complete products.**
**Set appropriate execution intervals (e.g., hourly, daily)**
To enable parallel processing in a configuration, you need to create multiple schedulers for it. For example, you will see at least five schedulers set up for **“Spryker - Send Complete Products.”** This means the configuration within that scheduler will run with five parallel processes. Enable the schedulers.
## **Monitoring & Troubleshooting**
**Checking Logs**
* Navigate to **Incoming, Route or Task page → Logs** in Alumio.
* Review task execution details and error messages.
* Debug issues by checking logs for **failed transformations or API responses.**
**Common Issues & Fixes**
 **Next Steps**
* Verify synchronization results by checking the Spryker backend.
* Adjust data transformation rules if necessary.
* Continue monitoring logs and optimize performance based on scheduler execution times, number of products per task etc.
**Next Steps**
* Verify synchronization results by checking the Spryker backend.
* Adjust data transformation rules if necessary.
* Continue monitoring logs and optimize performance based on scheduler execution times, number of products per task etc.