> ## Documentation Index
> Fetch the complete documentation index at: https://docs.alumio.com/llms.txt
> Use this file to discover all available pages before exploring further.
# Veeqo
> Connect Alumio to Veeqo.
## Extra information
System documentation: \[Veeqo API Reference]
# Setting up HTTP Client Veeqo
Veeqo provides two methods for authentication when integrating with its API: **OAuth2.0** and **API Keys**. Below are the steps to configure the Veeqo HTTP client in the Alumio dashboard.
## Steps
1. **Navigate to Alumio Dashboard**:
* Log in to your Alumio Dashboard.
* Go to **Clients** > **HTTPS Client**.
* Click **Create a New HTTP Client**.
2. **Select Veeqo as the HTTP Client Prototype**:
* From the list of available HTTP client prototypes, select **Veeqo HTTP Client**.
3. **Base Configuration**:
* In the **General** tab, fill in the **Base URI** with the Veeqo API URL:
[https://api.veeqo.com](https://api.veeqo.com).
4. **Authentication Configuration**:
* **For API Key Authentication**:
* Select **API Keys** from the **Authentication Type** dropdown.
* Enter the **API Key** provided by Veeqo in the **API Keys** field.
* **For OAuth2.0 Authentication**:
* Select **OAuth2.0** from the **Authentication Type** dropdown.
* Enter the following details:
* **Authorize URL**: `https://app.veeqo.com/oauth/authorize` (Set Default)
* **Access Token URL**: `https://app.veeqo.com/oauth/token` (Set Default)
* **Client ID**: Enter your Veeqo Client ID.
* **Client Secret**: Enter your Veeqo Client Secret.
* **Scopes**: Define the scopes for your OAuth token, if necessary (optional).
5. **Optional Logging**:
* If needed, enable **Request Logging** by checking the box for **Enable Logging of Requests**.
* Choose a formatter for the log data. It’s recommended to use **Full Request (Headers & Body)** for debugging purposes.
6. **Save the Client**:
* Once all details are filled in, click **Save** to store the HTTP Client configuration.
* The Veeqo client is now ready for use in Alumio integrations.
7. **Testing the Client** (Optional):
* You may test the connection by triggering an API call to ensure that the HTTP client is set up correctly and that the authentication is working as expected.
# Subscribing to Entities from Veeqo
This section explains how to subscribe to entities from the Veeqo API by configuring an **Incoming** connection in the Alumio platform.
## Steps
1. **Create Incoming Configuration:**
* Go to Connections > Incoming and create a new configuration.
* Select Veeqo Subscriber as the subscriber.
2. **Select an Entity:**
* Choose the Veeqo entity (e.g., orders, products) you want to subscribe to.
3. **Add Request Parameters (Optional):**
* if needed, provide any request parameters (e.g., order\_id) to customize the data retrieval.
4. **Pick the Veeqo HTTP Client:**
* Select the Veeqo HTTP client you’ve already set up for authentication (OAuth2 or API Key).
5. **Save the configuration.**
## General Concept
We follow Veeqo documentation on building this connector so you can easily use the connector based on Veeqo API Reference.
### Method
This defines the HTTP method (e.g., `GET`, `POST`) to use when subscribing to Veeqo. The method will change based on the entity you're working with.
### Entity
The entity refers to the resource you are subscribing to in Veeqo (e.g., orders, products). Refer to the Management APIs section in the Veeqo API Reference for more information.
### Request Parameters
Request parameters allow you to customize your API requests. You can define path variables and query parameters in this section.
For example, on subscribing "View an Order Detail", you can include the `order_id` in the path parameter like so:
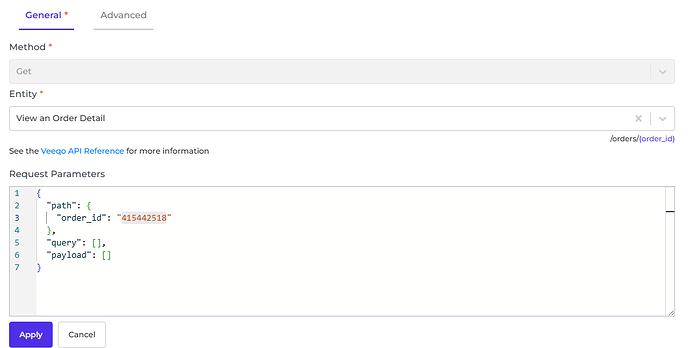
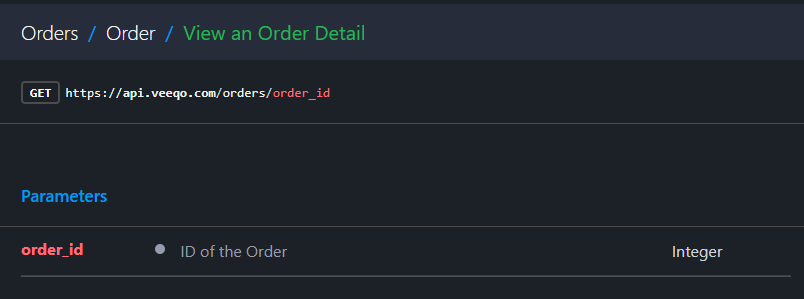 This will result in the following API call:
`GET /orders/415442518`
### Input Transformer
Any transformer’s set here will be executed after the Request Parameters are loaded. So, you basically can add any transformer to provide and transform the request parameters into anything you need either as path parameters and/or as query parameters of an entity.
### HTTP Client
This is the pre-configured HTTP Client that will handle the actual API request to Veeqo. It ensures proper authentication (either through **OAuth2.0** or **API Keys**) and manages the connection to Veeqo's API.
# Publishing Entity to Veeqo
This section shows how to publish data from Alumio to Veeqo.
## Steps
* **Create an Outgoing Configuration**:
* Go to **Connections** > **Outgoing**, and create a new configuration.
* Select **Veeqo Publisher** as the publisher.
* **Choose the Method**:
* Select the method you want to perform (e.g., `Post`, `Put`, `Delete`).
* **Pick the Veeqo Entity**:
* Choose the Veeqo entity you want to publish data to (e.g., products, orders).
* **Add Query Parameters** (Optional):
* If needed, add query parameters to the request.
* **Transform Data** (Optional):
* Optionally, use transformers to modify the data before sending it to Veeqo.
* **Select the HTTP Client**:
* Choose the Veeqo HTTP client that you’ve set up for authentication.
* **Save** the configuration.
### **General Concept**
Like the subscriber, the publisher has similar methods on how to use it. The difference is the payload that will be submitted by the publisher originating from the data (from routes, from transformers in outgoing configuration), though you can also add or modify payload using the Request Transformer.
### Method
This defines the type of HTTP method you want to use when interacting with Veeqo. We currently support the following methods:
* **Post**: Used to create new data, such as creating a new product or order.
* **Put**: Used to update existing data, such as modifying an existing product or updating order details.
* **Delete**: Used to remove or delete data from Veeqo, such as deleting an order or product.
The method directly correlates with the type of action being performed on the data, Note that it is possible the purpose of the method might be different (example : post used for updating), please refer to the Veeqo API Documentation.
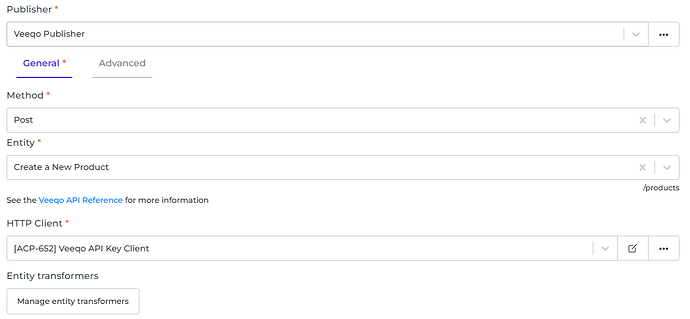
### Entity
For endpoints that require an object as the request payload, please look at the example below. For example, we want to Create a New Product. Please select “Post” as the action and “Create a New Product” as the entity of the publisher.
This will result in the following API call:
`GET /orders/415442518`
### Input Transformer
Any transformer’s set here will be executed after the Request Parameters are loaded. So, you basically can add any transformer to provide and transform the request parameters into anything you need either as path parameters and/or as query parameters of an entity.
### HTTP Client
This is the pre-configured HTTP Client that will handle the actual API request to Veeqo. It ensures proper authentication (either through **OAuth2.0** or **API Keys**) and manages the connection to Veeqo's API.
# Publishing Entity to Veeqo
This section shows how to publish data from Alumio to Veeqo.
## Steps
* **Create an Outgoing Configuration**:
* Go to **Connections** > **Outgoing**, and create a new configuration.
* Select **Veeqo Publisher** as the publisher.
* **Choose the Method**:
* Select the method you want to perform (e.g., `Post`, `Put`, `Delete`).
* **Pick the Veeqo Entity**:
* Choose the Veeqo entity you want to publish data to (e.g., products, orders).
* **Add Query Parameters** (Optional):
* If needed, add query parameters to the request.
* **Transform Data** (Optional):
* Optionally, use transformers to modify the data before sending it to Veeqo.
* **Select the HTTP Client**:
* Choose the Veeqo HTTP client that you’ve set up for authentication.
* **Save** the configuration.
### **General Concept**
Like the subscriber, the publisher has similar methods on how to use it. The difference is the payload that will be submitted by the publisher originating from the data (from routes, from transformers in outgoing configuration), though you can also add or modify payload using the Request Transformer.
### Method
This defines the type of HTTP method you want to use when interacting with Veeqo. We currently support the following methods:
* **Post**: Used to create new data, such as creating a new product or order.
* **Put**: Used to update existing data, such as modifying an existing product or updating order details.
* **Delete**: Used to remove or delete data from Veeqo, such as deleting an order or product.
The method directly correlates with the type of action being performed on the data, Note that it is possible the purpose of the method might be different (example : post used for updating), please refer to the Veeqo API Documentation.
### Entity
For endpoints that require an object as the request payload, please look at the example below. For example, we want to Create a New Product. Please select “Post” as the action and “Create a New Product” as the entity of the publisher.
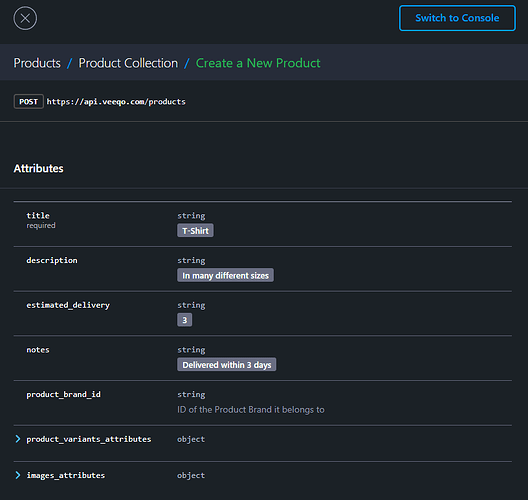 You can put the payload you want to send to Veeqo into the payload property in the data.
Alumio will send an API request to Veeqo with URL `/products`
**HTTP Client**
This is the pre-configured HTTP Client that will handle the actual API request to Veeqo. It ensures proper authentication (either through **OAuth2.0** or **API Keys** ) and manages the connection to Veeqo’s API.
You can put the payload you want to send to Veeqo into the payload property in the data.
Alumio will send an API request to Veeqo with URL `/products`
**HTTP Client**
This is the pre-configured HTTP Client that will handle the actual API request to Veeqo. It ensures proper authentication (either through **OAuth2.0** or **API Keys** ) and manages the connection to Veeqo’s API.