> ## Documentation Index
> Fetch the complete documentation index at: https://docs.alumio.com/llms.txt
> Use this file to discover all available pages before exploring further.
# Sylius
> Connect Alumio to Sylius.
## Extra information
System documentation: [https://docs.sylius.com/en/latest/book/api/index.html](https://docs.sylius.com/en/latest/book/api/index.html)
## Connector package documentation
### Table of Contents
* **1.** Setting up the Sylius HTTP Client
* **1.1** Steps
* **2.** Subscribing to entities from Sylius
* **2.1** Steps
* **2.2** General concept
* **3.** Publishing entities to Sylius
* **3.1** Steps
* **3.2** General concept
### 1. Setting up the Sylius HTTP Client
**1.1 Steps**
1. In Alumio Dashboard, go to Clients > HTTPS Client. Create a new HTTP Client and select Sylius HTTP Client as the prototype of the HTTP Client.
2. Fill in the Base URI
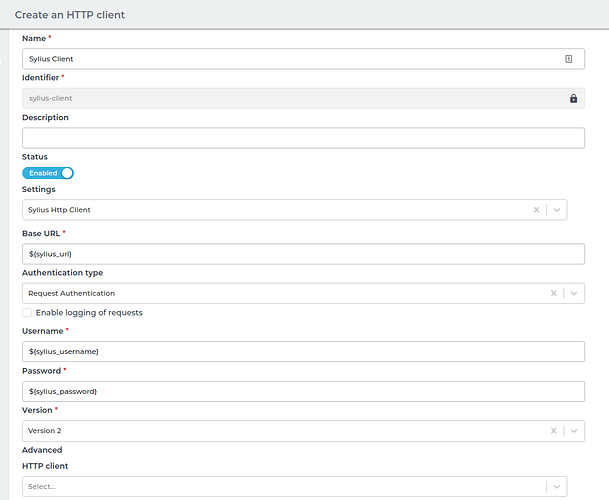 3. Choose the “Authentication Type”. You can use “Request Authentication” (JWT Authentication) or “Bearer Token” for this part.
For more information regarding authentication please refer to this [https://docs.sylius.com/en/latest/book/api/authorization.html](https://docs.sylius.com/en/latest/book/api/authorization.html) page.
4. In Alumio Dashboard, go to Clients > HTTPS Client. Create a new HTTP Client and select Sylius HTTP Client.
5. If you choose “Request Authentication, " you’ll need to fill in Username and Password. For “Bearer Token” you’ll need to fill in the Token.
6. You can optionally enable logging of requests to get the log of the authentication.
7. Save the HTTP Client.
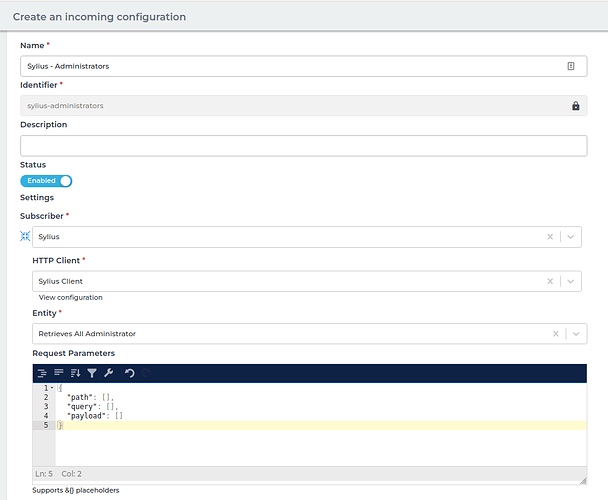
### 2. Subscribing to Entities from Sylius
**2.1 Steps**
1. Go to Connections -> Incoming, create a new incoming configuration, and select Sylius Subscriber as the subscriber.
2. Select the entity you want to subscribe to from Sylius.
3. Add the public key and secret key.
4. Add any request parameters needed to subscribe to the entity (optional).
5. If necessary, you can add a transformer to manipulate the request parameters into something you need.
6. Select the Sylius HTTP Client to use.
7. You can add a pagination feature to allow Alumio to fetch a paginated entity.
**2.2 General Concept**
We follow Sylius documentation on building this connector, so you can easily use the connector based on Sylius API Reference.
**Entity**
This is the entity you want to subscribe to from Sylius. Please refer to the entities in Management APIs from the Sylius API Reference page.
**Request Parameters**
You can provide these parameters to get the needed entity based on Sylius API Reference. Please look at the example below on how to fill Request Parameters when subscribing to "Retrieves All Administrator"
3. Choose the “Authentication Type”. You can use “Request Authentication” (JWT Authentication) or “Bearer Token” for this part.
For more information regarding authentication please refer to this [https://docs.sylius.com/en/latest/book/api/authorization.html](https://docs.sylius.com/en/latest/book/api/authorization.html) page.
4. In Alumio Dashboard, go to Clients > HTTPS Client. Create a new HTTP Client and select Sylius HTTP Client.
5. If you choose “Request Authentication, " you’ll need to fill in Username and Password. For “Bearer Token” you’ll need to fill in the Token.
6. You can optionally enable logging of requests to get the log of the authentication.
7. Save the HTTP Client.
### 2. Subscribing to Entities from Sylius
**2.1 Steps**
1. Go to Connections -> Incoming, create a new incoming configuration, and select Sylius Subscriber as the subscriber.
2. Select the entity you want to subscribe to from Sylius.
3. Add the public key and secret key.
4. Add any request parameters needed to subscribe to the entity (optional).
5. If necessary, you can add a transformer to manipulate the request parameters into something you need.
6. Select the Sylius HTTP Client to use.
7. You can add a pagination feature to allow Alumio to fetch a paginated entity.
**2.2 General Concept**
We follow Sylius documentation on building this connector, so you can easily use the connector based on Sylius API Reference.
**Entity**
This is the entity you want to subscribe to from Sylius. Please refer to the entities in Management APIs from the Sylius API Reference page.
**Request Parameters**
You can provide these parameters to get the needed entity based on Sylius API Reference. Please look at the example below on how to fill Request Parameters when subscribing to "Retrieves All Administrator"
 Another example is when we want to retrieve a single customer, we can use the Entity "Retrieves Customer by ID".
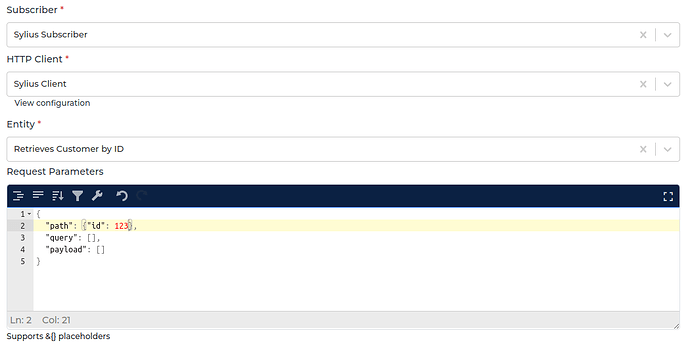 * Path is the path parameter of the URL. For example, the \{id}.
* Query is a defined set of parameters attached to the end of a URL.\
Example: [www.url.com?type=true\&start=0](http://www.url.com?type=true\&start=0)
We can add the id into Path in the Request Parameters, and Alumio will request with URL /admin/customers/123
**Input Transformer**
Any transformers set here will be executed after the Request Parameters are loaded. You can add any transformer to provide and manipulate the request parameters into anything you need if necessary, either as path parameters and/or as query parameters of an entity.
**HTTP Client**
This is the HTTP Client configuration or prototype you will use to access Sylius.
### 3. Publishing entity to Sylius
**3.1 Steps**
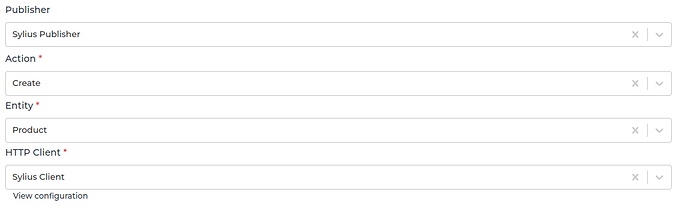
1. Go to Connections -> Outgoing, create a new outgoing configuration, and select Sylius Publisher as the publisher.
2. Select the action that you want the publisher to do with the data.
3. Select the Sylius entity where you want the data to be published.
4. You can optionally add any query parameters to the request.
5. You can also add any transformers to manipulate the data into anything you need before submitting it to Sylius.
6. Select the HTTP Client to use.
* Path is the path parameter of the URL. For example, the \{id}.
* Query is a defined set of parameters attached to the end of a URL.\
Example: [www.url.com?type=true\&start=0](http://www.url.com?type=true\&start=0)
We can add the id into Path in the Request Parameters, and Alumio will request with URL /admin/customers/123
**Input Transformer**
Any transformers set here will be executed after the Request Parameters are loaded. You can add any transformer to provide and manipulate the request parameters into anything you need if necessary, either as path parameters and/or as query parameters of an entity.
**HTTP Client**
This is the HTTP Client configuration or prototype you will use to access Sylius.
### 3. Publishing entity to Sylius
**3.1 Steps**
1. Go to Connections -> Outgoing, create a new outgoing configuration, and select Sylius Publisher as the publisher.
2. Select the action that you want the publisher to do with the data.
3. Select the Sylius entity where you want the data to be published.
4. You can optionally add any query parameters to the request.
5. You can also add any transformers to manipulate the data into anything you need before submitting it to Sylius.
6. Select the HTTP Client to use.
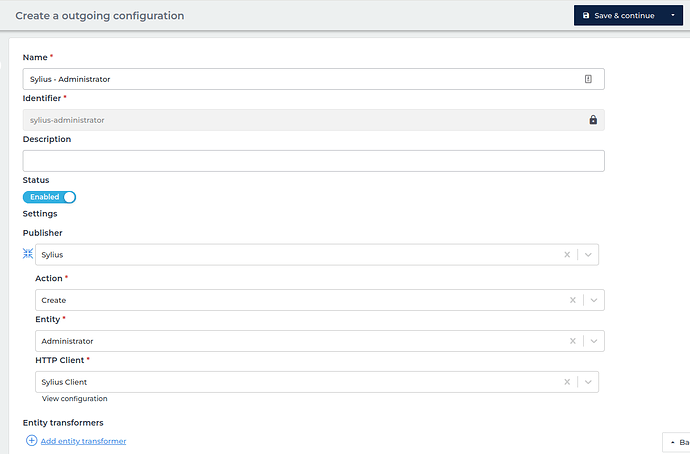 **3.2 General Concept**
Like the subscriber, the publisher has similar methods on how to use it. The difference is the payload that will be submitted by the publisher originating from the data (from routes, from transformers in outgoing configuration). However, you can also add or modify the payload using the Request Transformer.
**Action**
Currently, we support Create (HTTP POST method), Update (HTTP PUT method), and Delete (HTTP DELETE method) entities.
**Entity**
We support publishing to most Sylius endpoints. Please refer to the entities from the Sylius API Reference page. Based on the documentation, some endpoints may need one or more path parameters.
For example, when we want to create a product, we select the Action "Create" and the Entity "Product".
**3.2 General Concept**
Like the subscriber, the publisher has similar methods on how to use it. The difference is the payload that will be submitted by the publisher originating from the data (from routes, from transformers in outgoing configuration). However, you can also add or modify the payload using the Request Transformer.
**Action**
Currently, we support Create (HTTP POST method), Update (HTTP PUT method), and Delete (HTTP DELETE method) entities.
**Entity**
We support publishing to most Sylius endpoints. Please refer to the entities from the Sylius API Reference page. Based on the documentation, some endpoints may need one or more path parameters.
For example, when we want to create a product, we select the Action "Create" and the Entity "Product".
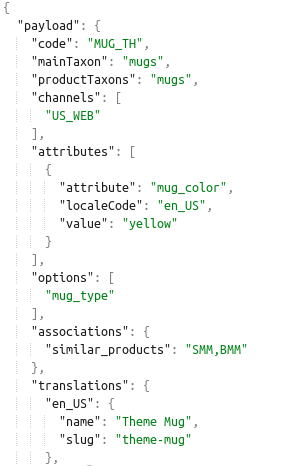
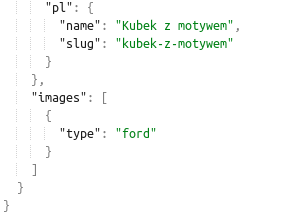
 We also need to provide payload in the data like
 * Path is the path parameter of the URL. For example, the \{id}.
* Query is a defined set of parameters attached to the end of a URL.\
Example: [www.url.com?type=true\&start=0](http://www.url.com?type=true\&start=0)
* Payload is the data contained within a request.
Alumio will request this to Sylius with the URL /admin/products
**HTTP Client**
This is the HTTP Client configuration or prototype you will use to access Sylius.
* Path is the path parameter of the URL. For example, the \{id}.
* Query is a defined set of parameters attached to the end of a URL.\
Example: [www.url.com?type=true\&start=0](http://www.url.com?type=true\&start=0)
* Payload is the data contained within a request.
Alumio will request this to Sylius with the URL /admin/products
**HTTP Client**
This is the HTTP Client configuration or prototype you will use to access Sylius.